Rust is a systems programming language in a similar space to C++ that I’ve been meaning to try out for some time. Reddit’s roguelikedev community recently began doing a community-wide roguelike-tutorial follow-along, and a member of the community conveniently ported the old python tutorial to Rust! I’ve got a repo to follow along here. So it begins. 😀
Or so it would have begun D:
It turns out that installing Rust can be a pretty painful and laborious experience, particularly if you try to be clever and thrifty like I did. So here’s how to properly install Rust on Windows, using the MSVC++ toolchain, in 2018 — first a summary, then I’ll explain my mistakes briefly, and then I’ll show some screenshots to make it even more clear.
A note on my Windows version:
I used this process to install Rust on a Windows 7 machine. I expect that Windows 8, 8.1, and 10 have similar requirements, options, and results, but I can’t guarantee it will be identical. Things are most likely very different if you want to use Rust via the Windows subsystem for Linux.
How To Install Rust on Windows in 2018
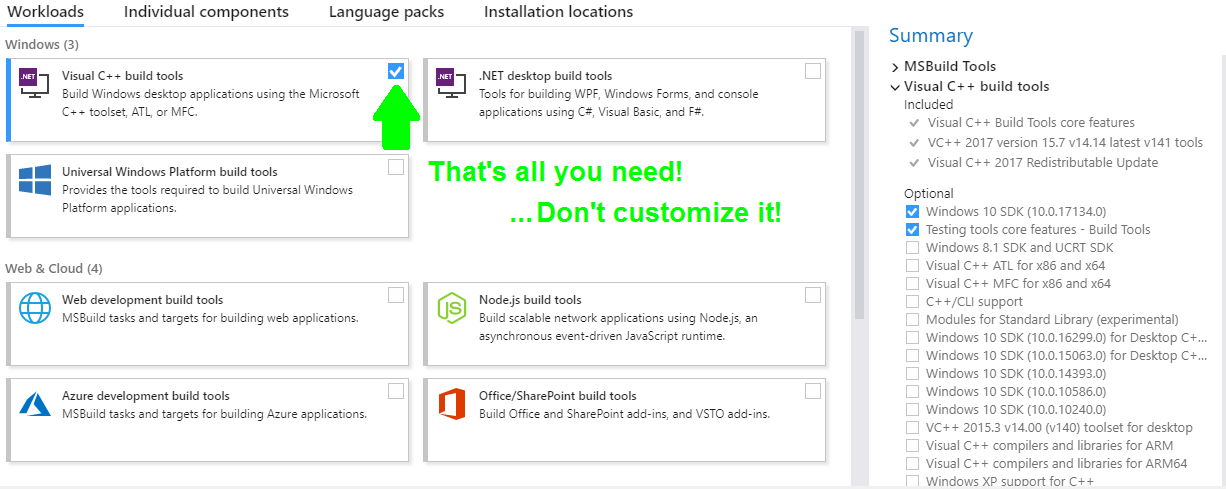
- Download and Install the MSVC++ Core Build Tools, and select just the main Visual C++ Build Tools option, then proceed. It will include the Windows 10 SDK (yes, Windows 10 is fine even if you’re on 7 or 8) and in the background it will include the Windows C Runtime (often called the CRT).
- Install Rust using rust-lang.org’s rustup_init tool, follow its few prompts, and wait very patiently through the installation of rust-doc that can run for 20+ minutes without any indications of progress.
- Restart any shells you had open to give them access to your updated environment variables. You should be ready to run
rustc --versionand check that things worked.
That looks easy! What did I do wrong?
First, I made the mistake of customising the Build Tool installation — it wants to download and install 3-6 GB of data and I thought I knew better. Then, during the very long rust-doc installation my first time through, I grew concerned that it had crashed and cancelled my installation halfway through. Then later, I trusted that I had the same understanding of the phrase “Core Build Tools” as the Rust installer. I proceeded to wade through old github issues for hours while slowly uninstalling and reinstalling repeatedly, and tinkering until it worked.
So, some rules to avoid these pitfalls:
- Do not customise the Core Build Tool installation! (unless you know you have to)
- Do not cancel your rust installation halfway through! (if you do, you’ll likely need to do a full uninstall to get back to a working rust)
- Do not trust that your idea of some jargon-y phrase like Core Build Tools is the same as the person who wrote the documentation! The Rust installer thinks of the “Core Build Tools” as the Core Build Tools and the Windows C runtime and the Windows SDK.
Screen by screen: How to install Rust on Windows
So first, download the MSVC++ Core Build Tools (the file is called vs_buildtools.exe):
The download is on this page, but not here at the top:
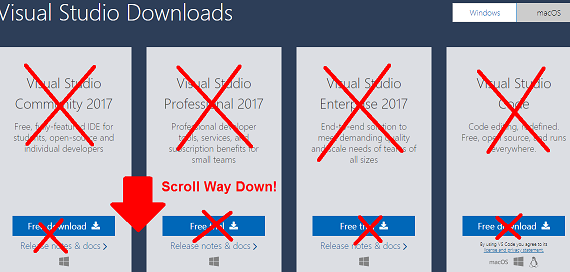
It’s here, quite far down:

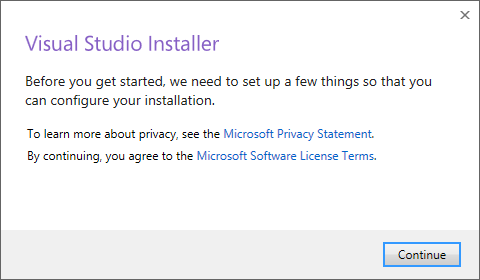
Launch that tool once you have it — as of June 2018, this is its name and icon:
![]()
It should look like this when run, and it will spend a bit of time downloading a bigger version of itself and seeming to disappear before giving you anything useful:
Once it finally opens up, only check off this one thing, and just accept that it’s going to be a multi-gigabyte download.
Once that’s done, you should be set for Visual Studio requirements! Now to install Rust. First, download rustup-init.exe from rust-lang.org:
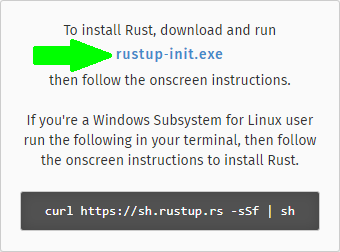
Then run it and follow the prompts:
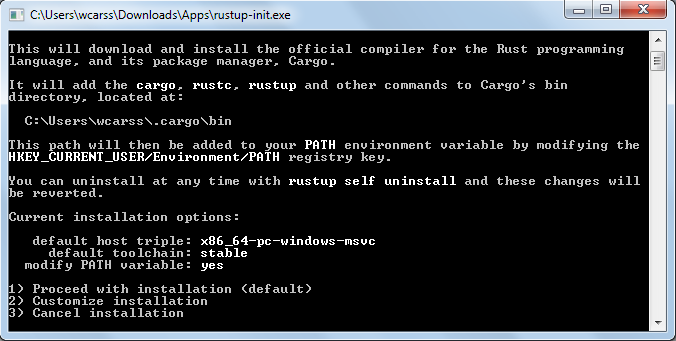
And wait… a 5 up to a 20 minute wait for rust-docs to finish is totally normal. :/

Hopefully, finally, success!
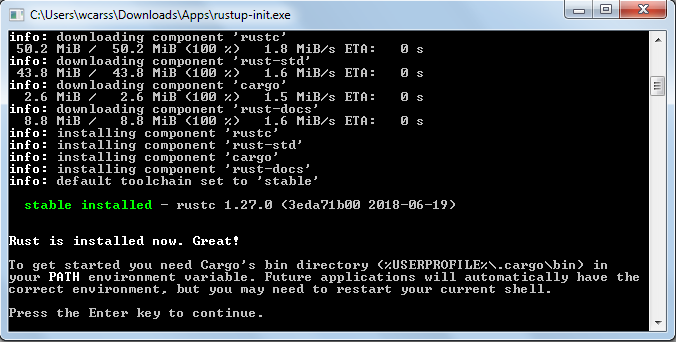
Close your open terminals, open a new one up, and try running rustc --version:

Then make a sample app by running cargo new --bin your_app_name, and try compiling+running it from within the new directory using cargo run --release as in the image below. I’ve added a few cat+ls calls to the image to show context, but you should see pretty similar things:
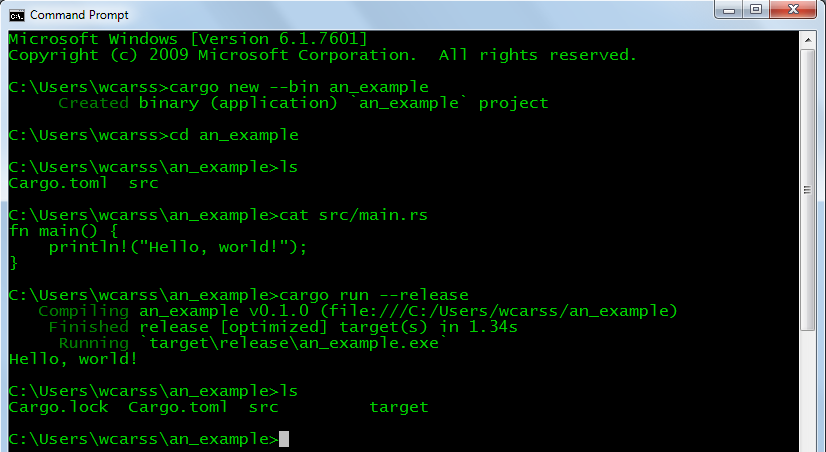
If your project ran like the above, you’re all set. You can finally live on as a happy rustacean. Congratulations! 😀
Did something go wrong? Here are some quick problems/solutions:
advapi32.dll not found:
This is the first DLL in the list that the linker looks for, and this pretty firmly means that Rust can’t find your Windows SDK. Usually that’s because the SDK is not installed. You should download the MSVC++ 2017 Core Build Tools, install them as shown above (they’ll include a Windows SDK by default), and then try reinstalling Rust.
user_32.dll not found:
This also means that Rust can’t find elements from the Windows SDK — maybe it’s old, or has been modified. Try following the same directions for the advapi32.dll problem above.
mspdb110.dll not found:
There’s a theme here: Rust’s linker can’t find things because they aren’t there or they’re broken. This one (I think) is from the C Runtime. Try uninstalling your MSVC++ and following the instructions above.
Some other kind of link.exe-related error:
This is probably also due to a Windows SDK, C Runtime, or Core Build Tools issue. Try the above MSVC++ installation step again before anything else — if you’ve done that already, maybe there’s an old MSVC++ hanging around in the way? Look in Add/Remove programs — careful though, you likely don’t need (or want) to remove anything called a “Redistributable”.
The Rust installer says no MSVC++ is installed:
If you definitely want to work with MSVC++ and are getting this, make sure you’ve followed the instructions above, and if you have it is possible that Visual Studio has been updated and moved things around again. Until a newer version of Rust comes along to fix the issue, if you can find a file called “vcvarsall.bat” inside of a folder similar to C:\Program Files (x86)\Microsoft Visual Studio\2017\BuildTools\VC\Auxiliary\Build, running that on your command line with an argument to specify your architecture should set the correct environment variables for Rust to find your MSVC++ installation.
Remember: that will only set the variables for the single terminal window you run them in, and it’ll need to be re-run if the window closes. I have a previous post (see Windows CMD Aliases) that may give you some ideas about automatically running code when you open a terminal on Windows.
If you want to, you can just hit continue here. To do so, you will need the MinGW compiler installed, and Rust will then target the GNU toolchain on Windows. This will mean that you can’t link against libraries built with MSVC++, which might be a dealbreaker.
The MSVC++ download link that Rust’s Installer gave me says it’s expired!
This is a weird one and should only be happening for a few weeks.
Someone thought a random Hubspot account could be a good place to host a file that the installer linked to, and it ended up not being so good a place. There is already a merged PR to fix the issue and point to the link from Microsoft, which is what I use above. Follow the directions there and you’ll be okay.
If for some reason you need the 2015 Visual Studio Core Build Tools, you can still get those through my link to the 2017 tools above, but you’ll have to wander into customising what you install. Remember that you need a Core Tools option, a Windows SDK (8.1+), and a CRT (C Runtime) at the minimum for Rust to work.
Rustup/rustc/cargo complains that it has no default target:
You might just not have a target set. You can tell rustup to target msvc++ by running something like rustup default x86_64-pc-windows-msvc. If that doesn’t work, you may not have fully installed Rust, perhaps due to a lack of permissions, or due to a pre-existing Rust installation that got in the way.
You should try to uninstall rust using rustup self uninstall, and once you get it gone, reinstall it. Maybe try a custom location if you don’t have access to the .cargo folder it was trying to install into. When it’s done, it should look something like the screen above with green text that says it was successful.
Other problems / these solutions didn’t work:
Sorry! This was just the set of problems I ran into and can recall after a nearly sleepless night. If you’re stuck, don’t forget that Google is your first and best friend in the world of problem-solving, but you may be able to get interactive help from humans on the Rust Community Forums, or on IRC on irc.mozilla.org’s #rust-beginners channel. You should likely glance over the community’s code of conduct before jumping into these spaces. 🙂
Conclusion
Hopefully this has helped you get off the ground with Rust on Windows! If I can save anyone some time out of this, that would make my painful experience far more worthwhile. Go forth and Rust! And keep an eye out for my own wicked Rust roguelike, The Glass Oak!
Thanks for the article!
I made the mistake of installing just the Windows 10 SDK and MSBuild tools. My banner blindness made me unable to see the “Visual C++ build tools” option under Workloads and so I originally went straight to individual components.
I got everything working now on my Windows 10 setup.